


Panzerblitz: Grossdeutschland Scenario set (17 EF and 1 WF scn) - The Matrix Games version of East Front II


| Rating: | 0 (0) |
| Games Played: | 0 |
| SM: | 5 |
| Turns: | 10 |
| Type: | Stock |
| First Side: | Germany |
| Second Side: | USSR |
| Downloads: | 643 |
DESIGN NOTES FOR PANZERBLITZ: GROSSDEUTSCHLAND
By Alan R. Arvold
Panzerblitz: Grossdeutschland was originally an 17-scenario set created by James Johnson, with some scenarios posted on Facebook. He created these to show the battles of the Grossdeutschland Division during the critical eleven-month period from the Kursk battles in July of 1943 to the battle of Targu Furmos in May of 1944. Although the series was made for Panzerblitz, James used a modified rule’s set based on the rules from Panzerblitz's sister games Panzer Leader and Arab-Israeli Wars. These included some new features to the basic game which I converted to East Front.
Scenario Length: All the scenarios in the original set are each twelve turns long. I have made each scenario in this set twelve turns long as well. While this works out fine for the small and medium scenarios, it can cause difficulty for the attacker in the large scenarios as he may find that he does not have enough time to achieve a victory. Player should feel free to lengthen the time by two to four turns to try to find a balance.
Victory Conditions: In East Front, every scenario has destruction of enemy units as a requirement, if only because it's part of the programming. Most have territorial objectives also and these will be described individually by scenario. One thing though, in all scenarios with objective hexes, the total number of Victory Points in them equals 800 points.
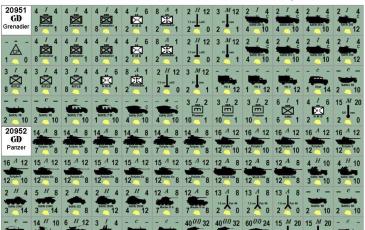
Variable Morale Levels: Units are assigned a morale level which determines the chances of recovering from a dispersal combat result. In other words, recovery from dispersal is no longer automatic. The morale levels are A, B, and C, which correspond to morale levels of 70%, 60%, and 50% in East Front. A further restriction is that infantry (which would include SMG, airborne, and recon troops) and rifle platoons are 10% lower than the morale level for the rest of the units of their side. This further applies to other support platoons within the rifle or infantry company (which are usually MG and Light Mortar units) but not to support platoons in their own companies. I used this feature in the Divided Ground series for the scenarios for Arab Israeli Wars and it seem appropriate to use it here.
Map Terrain Changes: The scenarios use the standard three Panzerblitz boards in the game, plus the five variant mapboards provided for this set. These boards have all been converted to East Front. Only in two of the scenarios are there major terrain changes to the map.
Soviet M-13 MRL Counters: Normally in Panzerblitz these units represent eight M-13 MRL vehicles, which is a battalion, but I believe that Johnson treated them like the tanks and now they represent four vehicles, which is a battery.
Weather Conditions: Panzerblitz does not normally have weather and environmental conditions but in six of the scenarios there is snow or mud to account for the reduction in movement allowances. Only in those scenarios, which occur in the fall, winter, and early spring, will the environment reflect those conditions, while the rest will be the standard normal ground and perfect visibility.
Scenario 1 – Cherkasskoye: The Left Wing: This is one of the scenarios with a major terrain change, namely, Board 1 has the northern half of it full of marsh hexes, which are taking the place of the wood hexes. The original victory conditions were based on how many units the Germans could get on Board 2. To simulate this, I put objective hexes on Board 2 to give the Germans a reason to go there.
Scenario 2 – Cherkasskoye: The Right Wing: This scenario portrays the eastern wing of the same attack in the previous scenario. In this scenario the Germans must take Hill 132 on Board 2. To give them a reason to do so, I put all the objective hexes on that hill.
Scenario 3 – Taking Hill 247.2 at Dubrova: In this scenario the Russian T-34 tank units that are in improved positions are frozen in place at the start. This is to simulate the fact that they were in dug-in hull-down positions. In the original game they are stuck there for the duration, but in East Front as soon as they are fired upon, they are released. The victory conditions include control of Hill 132, Opustoschenia, and getting enough units across the east-west stream in the northern half of the board. To simulate this, I put one objective hex on the hill and one in the town, plus two more north of the stream.
Scenario 4 – First Assault on Syrtsevo: The special rules in the original game allow the river to be crossed at certain hexes by all Russian units with-out the use of a bridge or boat. I interpreted this to mean that these hexes in the river were shallow. So, I made those hexes in the river shallow. However, in the original scenario only the Russians can use them, the Germans must treat them as regular river hexes. In East Front, both sides can use those hexes. The German attacker has three objectives, Hill 114, and the towns of Zapolye and Grodino. I put objective hexes in each of them.
Scenario 5 – Assault on Hill 243.0: The Pivot Left: No changes to the terrain in this scenario. The attacking German objectives are Hills 129 and 132, plus an exit hex in the western edge of the board. I placed objectives hexes on both hills and placed the exit hex on the road.
Scenario 6 - Defense at Kalinovka: No changes to the terrain in this scenario either. The victory conditions were based on the number of hills on Board 1 that the Russians possess at the end of the game. I put objective hexes on each of the hills on Board 1.
Scenario 7 – Defending the Karachev Railroad: I added an east-west railroad across the map as neither board had one. The victory conditions are based on the number of towns the Russians control on the central and southern parts of the board. I placed objective hexes in each town in question.
Scenario 8 – Delaying Action at Beyle-Berega: No changes to the terrain on this one. The original victory conditions were based on how fast in game turns the Russians can capture two of the three towns on Board 4. This cannot be duplicated in East Front, so, I just put objective hexes in each town on Board 4.
Scenario 9 – Rescue at Borisovka: No changes to the terrain in this scenario. The original victory conditions are based on how many units the Germans have on Board 7 at the end of the game. Again, this can not be duplicated in East Front, so, I put objective hexes in each town on Board 7. This will insure that the Germans have a reason moving onto Board 7 in mass.
Scenario 10 – Counterstrike at Akhtyrka: There are no changes to the terrain. Victory conditions are based on unit destruction and for the Germans, getting units off of the eastern edge of the board. I placed an exit hex on the roads leading off the eastern edge of the board.
Scenario 11 – Delaying Action at Michurin Rog: There are no changes to the terrain, but the ground is considered to be soft due to the onset of the fall rains. The Russians are set up on the south side of the river on Board 5, even though they can set up anywhere on that board. I did this because the river does not have any bridges or crossing points and the Russian artillery is all off-map anyway. The victory conditions call for the capture of the towns on Boards 2 and 7 by the Russians, and to facilitate this, I put objective hexes in each of the towns on both boards.
Scenario 12 – Spoiling Attack at Lykhovka: No changes to the terrain, but the ground is mud as the autumn rains are in full force. The victory conditions are unit elimination, and for the Germans, capturing as many of the hilltops on the board as they can by the end of the game. To facilitate this, I put an objective hex on every hill, with Hill 132 getting two because of its large size.
Scenario 13 – Fusilier Attack at Karlovka: No changes to the terrain, but the ground has snow. The victory conditions are based on how many towns on Board 7 the Germans can capture by the end of the game. To facilitate this, I put objective hexes in all the towns on Board 7.
Scenario 14 – Panzer Kampfgruppe in the Defense – Kirovograd: No changes in the terrain but the ground has snow. Victory conditions are based on unit elimination and on control of the towns on the board. All towns start the game under German control. I placed German objective hexes in each town so their mission is to keep as many as they can by game’s end.
Scenario 15 – River Delaying Action at the Lower Bug: While there are no changes to the terrain itself, there are three pontoon bridges set up on the river on Board 5. There is snow on the ground but the water is not frozen to reflect the above freezing temperatures in the area. In the original scenario, the victory conditions depended on the Russians either occupying or destroying the bridges. I placed objective hexes on each bridge for the Russians to capture.
Scenario 16 – Mobile Defense at Cornesti, Moldavia: No changes to the terrain, but there is snow on the ground. The water though, is not frozen as it is early spring. The victory conditions are based on how many units each side has on Board 1 at the end of the game. That cannot be directly simulated so I put eight objective hexes in both towns and every hilltop on Board 1 to give the Germans something to defend and the Russians something to capture.
Scenario 17 – Counterstrike at Targu Frumos: This is the largest scenario of the set, with six mapboards for the playing area. There are no changes to the terrain and the ground is normal as spring is in full bloom. The victory conditions are based purely on unit elimination, there are no objective hexes nor exit hexes in this scenario.
Conclusion: It is my hope that East Front players enjoy these new scenarios for the Grossdeutschland Division. Playing through them in order will show both the gradual erosion of the division’s strength over time as well as the growing maturity of Russian operations against the Germans. Certainly, a fascinating tactical study.
There was an eighteenth scenario in the original set, but it dealt with a battle on the Western Front in Normandy against the Western Allies. This really belongs in the game West Front and one day it shall appear there.
Editor’s note: this eighteenth scenario is included in this zip file in three files:
• GD Pbz18.map
• GD Pbz18.org
• GD Pbz18.scn
Scenario 18 must be moved to West Front game folder before playing it.
By Alan R. Arvold
Panzerblitz: Grossdeutschland was originally an 17-scenario set created by James Johnson, with some scenarios posted on Facebook. He created these to show the battles of the Grossdeutschland Division during the critical eleven-month period from the Kursk battles in July of 1943 to the battle of Targu Furmos in May of 1944. Although the series was made for Panzerblitz, James used a modified rule’s set based on the rules from Panzerblitz's sister games Panzer Leader and Arab-Israeli Wars. These included some new features to the basic game which I converted to East Front.
Scenario Length: All the scenarios in the original set are each twelve turns long. I have made each scenario in this set twelve turns long as well. While this works out fine for the small and medium scenarios, it can cause difficulty for the attacker in the large scenarios as he may find that he does not have enough time to achieve a victory. Player should feel free to lengthen the time by two to four turns to try to find a balance.
Victory Conditions: In East Front, every scenario has destruction of enemy units as a requirement, if only because it's part of the programming. Most have territorial objectives also and these will be described individually by scenario. One thing though, in all scenarios with objective hexes, the total number of Victory Points in them equals 800 points.
Variable Morale Levels: Units are assigned a morale level which determines the chances of recovering from a dispersal combat result. In other words, recovery from dispersal is no longer automatic. The morale levels are A, B, and C, which correspond to morale levels of 70%, 60%, and 50% in East Front. A further restriction is that infantry (which would include SMG, airborne, and recon troops) and rifle platoons are 10% lower than the morale level for the rest of the units of their side. This further applies to other support platoons within the rifle or infantry company (which are usually MG and Light Mortar units) but not to support platoons in their own companies. I used this feature in the Divided Ground series for the scenarios for Arab Israeli Wars and it seem appropriate to use it here.
Map Terrain Changes: The scenarios use the standard three Panzerblitz boards in the game, plus the five variant mapboards provided for this set. These boards have all been converted to East Front. Only in two of the scenarios are there major terrain changes to the map.
Soviet M-13 MRL Counters: Normally in Panzerblitz these units represent eight M-13 MRL vehicles, which is a battalion, but I believe that Johnson treated them like the tanks and now they represent four vehicles, which is a battery.
Weather Conditions: Panzerblitz does not normally have weather and environmental conditions but in six of the scenarios there is snow or mud to account for the reduction in movement allowances. Only in those scenarios, which occur in the fall, winter, and early spring, will the environment reflect those conditions, while the rest will be the standard normal ground and perfect visibility.
Scenario 1 – Cherkasskoye: The Left Wing: This is one of the scenarios with a major terrain change, namely, Board 1 has the northern half of it full of marsh hexes, which are taking the place of the wood hexes. The original victory conditions were based on how many units the Germans could get on Board 2. To simulate this, I put objective hexes on Board 2 to give the Germans a reason to go there.
Scenario 2 – Cherkasskoye: The Right Wing: This scenario portrays the eastern wing of the same attack in the previous scenario. In this scenario the Germans must take Hill 132 on Board 2. To give them a reason to do so, I put all the objective hexes on that hill.
Scenario 3 – Taking Hill 247.2 at Dubrova: In this scenario the Russian T-34 tank units that are in improved positions are frozen in place at the start. This is to simulate the fact that they were in dug-in hull-down positions. In the original game they are stuck there for the duration, but in East Front as soon as they are fired upon, they are released. The victory conditions include control of Hill 132, Opustoschenia, and getting enough units across the east-west stream in the northern half of the board. To simulate this, I put one objective hex on the hill and one in the town, plus two more north of the stream.
Scenario 4 – First Assault on Syrtsevo: The special rules in the original game allow the river to be crossed at certain hexes by all Russian units with-out the use of a bridge or boat. I interpreted this to mean that these hexes in the river were shallow. So, I made those hexes in the river shallow. However, in the original scenario only the Russians can use them, the Germans must treat them as regular river hexes. In East Front, both sides can use those hexes. The German attacker has three objectives, Hill 114, and the towns of Zapolye and Grodino. I put objective hexes in each of them.
Scenario 5 – Assault on Hill 243.0: The Pivot Left: No changes to the terrain in this scenario. The attacking German objectives are Hills 129 and 132, plus an exit hex in the western edge of the board. I placed objectives hexes on both hills and placed the exit hex on the road.
Scenario 6 - Defense at Kalinovka: No changes to the terrain in this scenario either. The victory conditions were based on the number of hills on Board 1 that the Russians possess at the end of the game. I put objective hexes on each of the hills on Board 1.
Scenario 7 – Defending the Karachev Railroad: I added an east-west railroad across the map as neither board had one. The victory conditions are based on the number of towns the Russians control on the central and southern parts of the board. I placed objective hexes in each town in question.
Scenario 8 – Delaying Action at Beyle-Berega: No changes to the terrain on this one. The original victory conditions were based on how fast in game turns the Russians can capture two of the three towns on Board 4. This cannot be duplicated in East Front, so, I just put objective hexes in each town on Board 4.
Scenario 9 – Rescue at Borisovka: No changes to the terrain in this scenario. The original victory conditions are based on how many units the Germans have on Board 7 at the end of the game. Again, this can not be duplicated in East Front, so, I put objective hexes in each town on Board 7. This will insure that the Germans have a reason moving onto Board 7 in mass.
Scenario 10 – Counterstrike at Akhtyrka: There are no changes to the terrain. Victory conditions are based on unit destruction and for the Germans, getting units off of the eastern edge of the board. I placed an exit hex on the roads leading off the eastern edge of the board.
Scenario 11 – Delaying Action at Michurin Rog: There are no changes to the terrain, but the ground is considered to be soft due to the onset of the fall rains. The Russians are set up on the south side of the river on Board 5, even though they can set up anywhere on that board. I did this because the river does not have any bridges or crossing points and the Russian artillery is all off-map anyway. The victory conditions call for the capture of the towns on Boards 2 and 7 by the Russians, and to facilitate this, I put objective hexes in each of the towns on both boards.
Scenario 12 – Spoiling Attack at Lykhovka: No changes to the terrain, but the ground is mud as the autumn rains are in full force. The victory conditions are unit elimination, and for the Germans, capturing as many of the hilltops on the board as they can by the end of the game. To facilitate this, I put an objective hex on every hill, with Hill 132 getting two because of its large size.
Scenario 13 – Fusilier Attack at Karlovka: No changes to the terrain, but the ground has snow. The victory conditions are based on how many towns on Board 7 the Germans can capture by the end of the game. To facilitate this, I put objective hexes in all the towns on Board 7.
Scenario 14 – Panzer Kampfgruppe in the Defense – Kirovograd: No changes in the terrain but the ground has snow. Victory conditions are based on unit elimination and on control of the towns on the board. All towns start the game under German control. I placed German objective hexes in each town so their mission is to keep as many as they can by game’s end.
Scenario 15 – River Delaying Action at the Lower Bug: While there are no changes to the terrain itself, there are three pontoon bridges set up on the river on Board 5. There is snow on the ground but the water is not frozen to reflect the above freezing temperatures in the area. In the original scenario, the victory conditions depended on the Russians either occupying or destroying the bridges. I placed objective hexes on each bridge for the Russians to capture.
Scenario 16 – Mobile Defense at Cornesti, Moldavia: No changes to the terrain, but there is snow on the ground. The water though, is not frozen as it is early spring. The victory conditions are based on how many units each side has on Board 1 at the end of the game. That cannot be directly simulated so I put eight objective hexes in both towns and every hilltop on Board 1 to give the Germans something to defend and the Russians something to capture.
Scenario 17 – Counterstrike at Targu Frumos: This is the largest scenario of the set, with six mapboards for the playing area. There are no changes to the terrain and the ground is normal as spring is in full bloom. The victory conditions are based purely on unit elimination, there are no objective hexes nor exit hexes in this scenario.
Conclusion: It is my hope that East Front players enjoy these new scenarios for the Grossdeutschland Division. Playing through them in order will show both the gradual erosion of the division’s strength over time as well as the growing maturity of Russian operations against the Germans. Certainly, a fascinating tactical study.
There was an eighteenth scenario in the original set, but it dealt with a battle on the Western Front in Normandy against the Western Allies. This really belongs in the game West Front and one day it shall appear there.
Editor’s note: this eighteenth scenario is included in this zip file in three files:
• GD Pbz18.map
• GD Pbz18.org
• GD Pbz18.scn
Scenario 18 must be moved to West Front game folder before playing it.


)